How to install an interior door lining plumb, level, square & 'in wind' so you can easily hang a perfect door in it
|
It's really important to fit the door lining perfectly so that when you come to hang the door in it later on it is straight forward, quick and simple. A correctly installed interior/exterior frame needs to be;
'In wind' means that both jambs or legs are parallel with each other. If they're not in wind they will be twisted slightly, meaning when you close the door the top will close before the bottom, or vice versa. The above is even more important for a double door frame because there are two doors that need to line up perfectly with one another. Any mistakes become twice as bad! You've probably come across a door that's had this problem at some point it's fairly common! Sometimes it's noticeable because when the door closes it touches the stop but doesn't click shut, and you have to push it harder for the latch to locate (this could be ill fitting door stops as well). |
What is happening here is either the very top of the door or the bottom is hitting the door stop before the rest of the door, meaning the latch hasn't reached the point at which it will click shut yet.
Pushing harder flexes the door enough to latch it shut. When in the closed position, the door is not flush with the linings edge.
Tools required to install door linings
- Hammer/tape measure
- Spirit levels (600mm + 1800mm for the head and legs)
- Battery drill/driver & screwdriver bits
- Pilot hole drill bits
- Screws/fixings
- Plastic or timber folding wedges cut from some scrap
- String lines
Assembling and preparing the door lining ready to fit into the opening
If you have bought a pre-made lining kit, the door lining's head should be housed out either side for the legs to slot into.
Sometimes the housing is the same thickness as the leg, other times only half the thickness is removed and the top of the lining leg has a half tenon that slots into the head.
In this case, make sure you put the legs in the correct way around to allow for your doors width.
Generally doors are 1981mm tall and start at 610mm (2ft) wide and increase by 76mm increments (3 inches, 2'3", 2'6", 2'9").
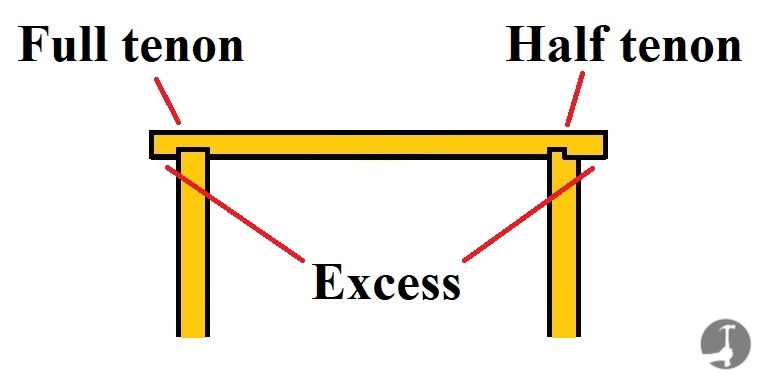
Personally if given a choice i'd always choose the lining where the housing is the same thickness as the leg (above left) because if the leg happens to be bowed, gets damaged or there's a nasty knot/shake in one side then you can just spin it around and use the good side - not possible if it will only work one way around.
The head of a door lining set is also often housed out on both sides to accomodate two different sizes of door. If you are making a door lining up yourself from stock timber add around 5mm (1/4") to the width of the door to ensure a gap either side of the door when it's hung.
Determine and drill through the housed section you want so the legs can be screwed down into from the top of the header.
I usually drill 3 clearance holes in each slot.
Then, using plenty of PVA wood glue assemble the lining and screw the legs in with 75-90mm screws.
Finally, cut the excess timber off the head. You can leave a bit of this on if the opening is much wider as it may help keep the frame in place while you work. In this instance measure the openings width and cut the head to that measurement so it can wedge in tight.
How to square the door lining up because your door will probably be square too..
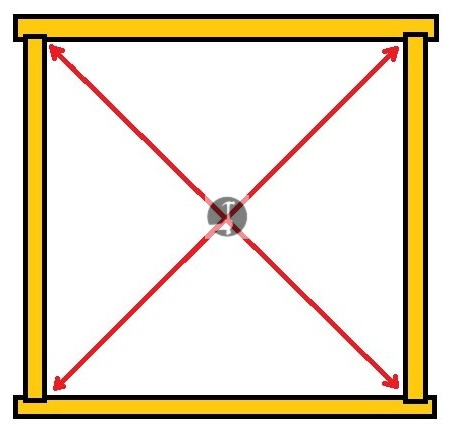
It's easier to install if you've already braced it in a perfectly square position. If the frame you are installing is a hatch like a loft trap you can check it is square by measuring from corner to corner (measurements should be identical).
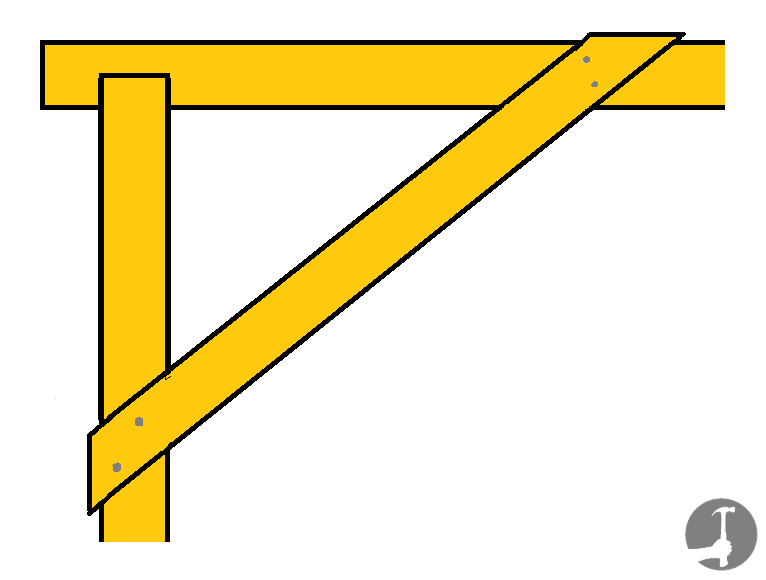
If fitting a normal door frame, it's far easier to install if you first brace the legs at the bottom with an off-cut of timber so they are held the same distance apart as the top and also brace the top corner of the frames hinge side diagonally. This will keep it held square while you're working on it in the opening.
It also makes it easier to move into position as it's not trying to fall apart as you manoeuvre it.
To brace the bottom at the same width as the top, grab a piece of batten and cut it to the same overall width as the head (outside to outside measurement of the legs).
 |
 |
Mark with a tape measure 150mm (6") up from the bottom of each leg and nail the batten to that line, flush with the outside.
This will keep the bottom of the legs the same distance apart as the top is. Some carpenters repeat this on both sides to keep the legs really straight.
Next, grab another batten and fix it diagonally from the head of the door lining to a leg like in the pic above, to hold the top at a perfect 90° angle.
To square the linings head either use the 3 4 5 method or a large framing square to hold it at 90° (more accurate/quicker) while you brace it. (Nail toward the outer edge without splitting so the architrave will cover the nail holes up later).
When the frame is braced up it should look like the one below and feel fairly sturdy as well
Installing the newly assembled (& Square) door lining into the opening
- Step 1 - Level the head of the lining first
Place the door lining in the opening and check that the head is level. I always mark the hinge side straight away so if I remove the frame to work on it, I know which way to put it back in.
If the head isn't perfectly level put a wedge under the side that needs to go up until it is perfect. Measure the gap under the wedged side, and cut that much off the bottom of the other leg. This should make the lining sit down flat & level when you put it back into the opening.
- Step 2: Fix the hinge side of the door lining first
The hinge side is the most important one to get straight, solid and level at this point.
When fitting a door frame to stud-work walls, I drill and countersink 8-10 holes in each leg, in pairs - 100mm down from the top, the same up from the bottom and then equally spaced in between.
By screwing the frame in place you can adjust it by winding the screws in/out later and wedging behind it.
If the wall you are fitting to is masonry you'll want to space the screws so they fall in the middle of the bricks or blocks instead because too close to the edge of a brick and it'll just split or shatter. It's not always easy to get a decent fixing in the cement joint either.
If you won't be able to see the bricks when the lining is in because the wall is already plastered, mark the center of the bricks on the face of the wall or lining before sliding the frame into position. Use 80-100mm long screws and red/brown rawl plugs (more info about drilling into brick walls here).
Next, I fit the lining in position and screw the hinge side up first, making sure it is perfectly level and equally overhangs the wall behind. Put a 1800mm spirit level on the face to check it is straight, and use either timber packers (I rip a load of different size packers down) or folding wedges like in the picture on the right to wedge out any hollow areas.
- Step 3: Fix the opposite leg of the door lining to the wall, that the latch will fit to
Using a spirit level held across the face of the lining like in the drawing below (it's a birds eye view), make sure the frame is parallel with the wall, and there is an equal overhang before screwing the top of the opposite side.
This is important because the plasterer will want to use a straight edge exactly how you are using a spirit level now to make sure the wall is perfectly flat. If it's a stud-work wall it's still important because the door lining needs to maintain the 'flatness' (not sure that's actually a word..) of the wall when the plasterboard is screwed onto it.
Level the leg down and put one or two more screws into the bottom of the leg to hold it in place.

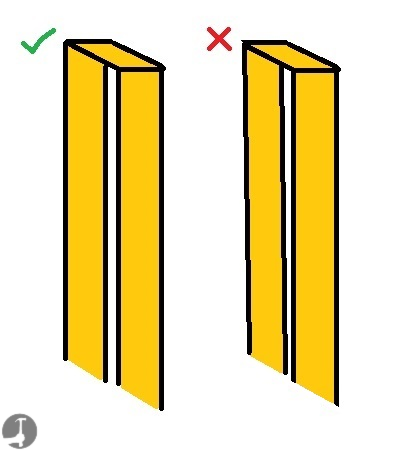
Then, sight the frame through to make sure it is 'in wind'.
This is done by sighting one edge of the door frame through to the opposite edge like below.
As you look through, let your eye wander from top to bottom and check the legs are parallel with one another.

The picture below shows a good and bad lining that doesn't sight through/is out of wind.
Again, this is important because if you get it wrong the wall won't be flat and when the door is hung it won't close properly.
The top will either close before the bottom, or vice versa.
Installing several door linings in a corridor
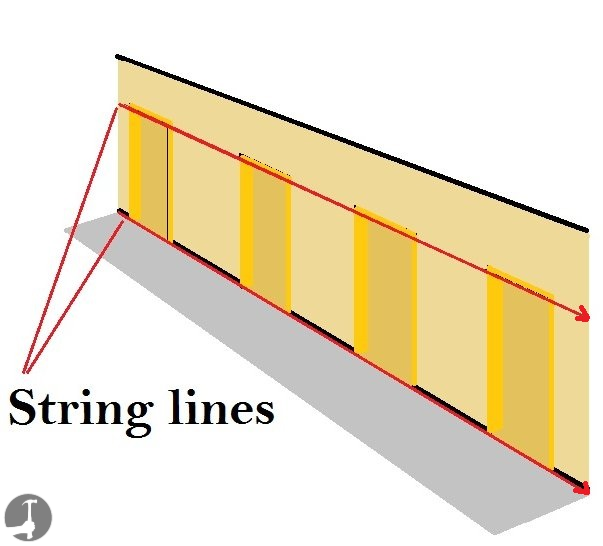
Occasionally you'll come up against a situation where several door linings need to be installed in a hallway or corridor and they'll all need to be the same height and perfectly in line.
It's more common in commercial projects, and buildings like schools/hospitals etc. than in a house.
To do this I fit one door frame correctly at each end, and then pull a couple of string lines tight from one to the other.
This makes installing the frames in between a lot quicker and easier as you simply put them up to the string lines and screw in place, before packing out to make sure the sides are straight.
What's next?
If the wall you are working on is built out of stud-work, once the door lining is installed you can start cutting and fitting the plasterboard sheets to the wall.
Click here to go back to the timber stud wall page
Or if you are ready to start hanging your doors, click here
Use the comments box below if you use a different method when installing door linings and frames?
