How to Build a Roof
Roof carpentry: Lean-to's, Gables, Hips, Rafters, Barges plus Fascias and Soffit Construction
|
All the pages in this section take you through how to build a roof from start to finish. Most of the information on the web assumes the reader already knows a bit about roof carpentry. Instead, I'm going to start at the beginning and describe each of the carpentry techniques used to build a pitched roof on a house, shed or other structure in detail before moving onto the much more complicated stuff. I'll use lots of detailed illustrations too so you should be able to understand it all even if you've no roofing experience whatsoever. If you already know a bit about how to build a roof you can skip down through the easy stuff and find the roof carpentry info you need. |
 |
How to build a roof: Components
Most roofs are triangular in shape. Forming a strong triangle is important in lots of types of roof design because it gives the roof it's strength. A roof also adds strength to the walls of a building.

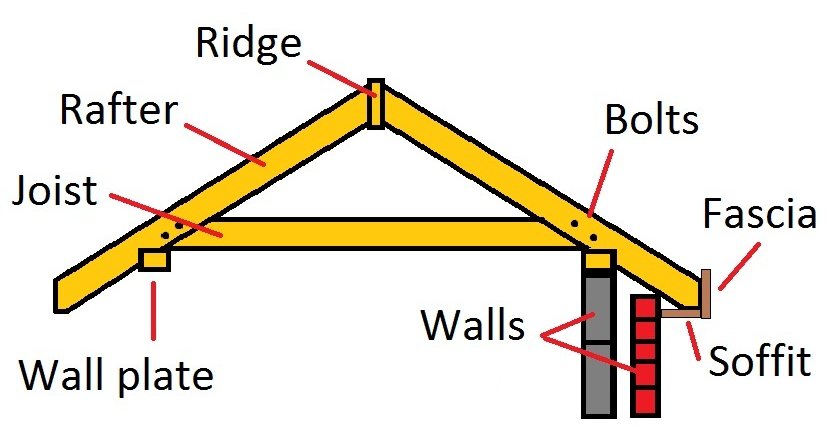
The diagram above shows the components that go into making up a small gable roof
The ridge is a long board at the top that the rafters are nailed to.
The rafter is cut so it sits down onto the wall plate, which is in turn fixed down onto the inside skin of a cavity wall.
The ceiling joists span from wall plate to wall plate and are sometimes bolted to the rafters to help stop the ridge dropping and the roof rafters spreading.
The joist completes the strong triangle shape with the rafters.
The overhanging ends of the rafters are cut specially so that the fascia and soffits can be fixed to them.
There are other components like pinch binders, purlins and props that are added to strengthen the roof but I'll cover those on the gable roof page later.
You may remember using trigonometry in school, I didn't enjoy it then and I still don't now! Although important to roofing, to know how to build a roof luckily you don't need to master trignometry.
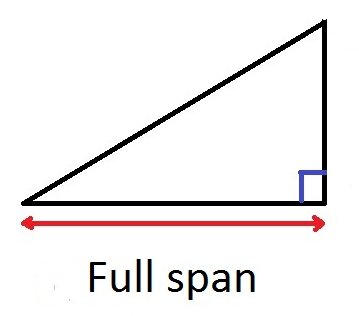
However, when building a roof it is important to understand that to work out most rafter lengths you need a 90° right angle triangle. A lean-to roof already forms a right angle triangle, like in the picture below;
Lean-to roof triangle

By knowing the span of the roof, and the pitch (the pitch is the angle at which the rafters rise) we can work out the length of the rafters.
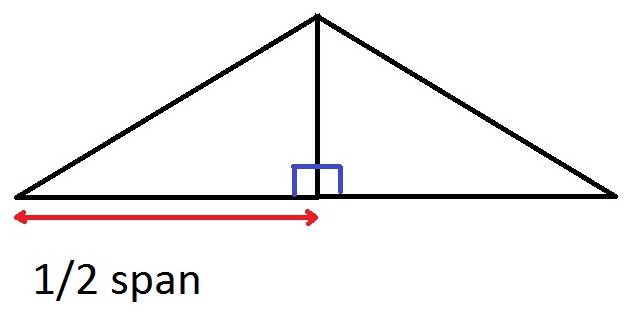
Gable-end roof construction

If the pitched roof is not a lean-to but a normal gable roof we have to divide the total roof/span by two in order to form two right angle triangles back to back. 1/2 the total span is equal to the horizontal span that one rafter will cover.
Importantly, we halve the full span to arrive at the distance each rafter will span on either side of the roof.
How to build a roof: Cutting and fixing the wall plates onto the brickwork for the roof rafters to sit onto
The wall plates that the rafters sit on and are fixed to need to be perfectly square, flat and level. To be square they must be parallel - the same distant apart at each end of the roof, and everywhere in between.
Hopefully the bricklayers have been good and made this job easy for you and there isnt too much adjustment needed.
To check for square corners measure diagonally from corner to corner (they should be identical) or you can use the 3 4 5 method to make sure your wall plates have perfect 90° corners.
To level the wall plates I find the straightest joist, lay it from one wall plate to the other and put an 1800mm spirit level on it.
Adjustments may need to be made before you start the roof by measuring your span. The span is the measurement from the outside of one wall plate to the outside of the opposite wall plate.
Click here for more help getting the wall plates right and fixing them down.
How to build a roof: Calculating your roof rafter lengths
Once your wall plates are square and level you are ready to calculate the common rafter lengths.
Common rafters are the main timbers used to build a gable roof and are in almost every hipped roof construction as well
Facia & Soffit construction
Click here for help installing fascia & soffit boards, that finish the bottom of the rafter feet off neatly and provide something for your gutters to fix to