How to drill a Pilot Hole correctly so you won't split the timber
How to choose the right size bit and drill countersink, pilot hole and clearance holes for wood screws & nails in timber, metal & gyproc/plasterboard

When do you need to drill a pilot hole (and should you bother)?
Countersinking screw heads, drilling a pilot hole and drilling a clearance hole for wood screws is handy during carpentry work for four reasons;
- to make it easier to wind the screw into the timber without threading the screw or rounding off the screw head
- to screw wood together without splitting the timber (especially thin timber or hardwood)
- to ensure the screw actually pulls the timber joint up tight
- to help bury the head of the screw below the surface of the timber or metal so it looks neater and can either sit flat or be filled flush for decorating
You can also drill and countersink holes in wood before hammering nails in for the same reasons as above, just choose a drill bit slightly thinner than the nail itself so it will still have enough friction to hold the join together tight.
If you are working with softwood like pine, you can often get away with screwing straight into the wood rather than drilling pilot holes first. But if you are doing 2nd fix carpentry that needs to be neat, drilling pilot/clearance & countersink holes is neater.
What is a countersink drill bit for?
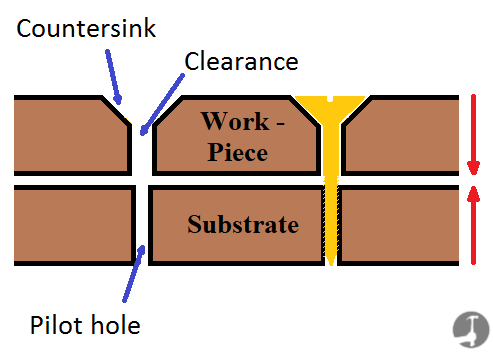
To countersink a hole is to cut a round, V shaped groove into the surface that will accommodate the tapered bottom of the screw head.
The screw head being the widest part of the screw can often be the part that causes the timber to split as you bury the screw head below the surface of the wood.
By countersinking the hole first prevents this from happening and looks neat enough to leave, or if you drill the countersink deep enough it can be filled over for painting and decorating as well.
If you are using dome head screws for eg. & don't want to countersink and fill over the screw, you can use screw cups like these instead if you want to tidy them up.
Special countersink drill bits are available to cut the shape, although you may just be able to use a larger HSS drill bit instead if you don't have a countersink bit to hand.
What is a clearance hole?
A clearance hole is one drilled into the first piece of timber that is slightly larger than the screws flat shank directly under the screw head.
Having a clearance hole ensures the two materials are pulled up tight when they're screwed together.
Without a clearance hole, as you wind the screw in to the two timbers a gap can develop in between them that doesn't get closed up - no matter how deeply you bury the screw head! Winding the screw head deeper wont close the gap, you will always have timber - air - timber.
The piece of timber you are fixing (the first piece the screw enters) should not actually be gripped by the screws threads - the screw should pass straight through it into the substrate and the screws head serves to pull the joint up tight and with no gaps.
Also when drilling a hole through metal to screw it to a piece of timber, it is more likely you would drill a clearance hole through the metal rather than a pilot hole. You would then drill a pilot hole into the wood.
What is a pilot hole?
A pilot hole is drilled in the substrate timber slightly smaller than the threads of the screw itself.
It allows the centre of the screw to pass easily through the timber, but because the hole is slightly smaller than the diameter of the threads they still have plenty of timber to bit into and grip.
Again this makes tightening the screw nice and easy and less likely to split.
When working with hardwood or particularly thin or brittle pieces of timber a pilot hole is essential to prevent the wood from splitting and also ensures you don't round or snap off the screw head because there is so much friction.
I use Trend drill & countersink bits that can do two jobs in one go - rather than having to change drill bits constantly.
What size drill bit should I use for pilot holes & clearance holes?
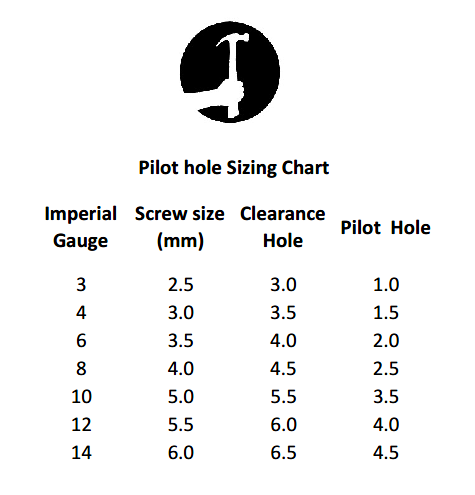
The pilot/clearance hole sizing chart above is a good guide as to which drill bit sizes you should choose for each type depending on the size of the screws you are using.
Always check before drilling, and remember the following information too;
- The clearance hole is to be drilled slightly larger than the screws threads allowing them to pass straight through without biting. They also need to be smaller than the screws head otherwise the head will pass through. (When you are fixing timber to brick/block or masonry walls, use a drill bit the same size as the masonry bit for the clearance hole).
- A pilot hole is drilled a smaller size to the clearance hole. Choose a drill bit the same size as the shank that holds the threads, so that when the screw is wound in only the threads actually bite. This will prevent the shank from splitting the timber.
- The countersink needs to be the same size as or slightly larger than the screws head. Some countersink bits are tapered so you need to use your skill and judgement to ensure you don't go too deep. You can also use a depth stop if your drill has one or put sticky tape round the bit so you know where to stop when drilling.
It is easy to check first that you have chosen the right drill bit size by holding the drill bit directly in front of or behind the screw to compare whether it is larger/smaller than the threads.
When screwing timber together after having drilled the pilot, clearance and countersink holes, if there is too much friction and you are pushing too hard, go back and use a slightly larger drill bit for the clearance or pilot hole to make it a little easier.
You can also put soap onto the screws threads when working with hard wood (Oak/Mahogany/Beech/Teak fo eg.) to help lubricate the threads.
How to drill a pilot hole in wood, metal or plasterboard
Once you have picked the correct drill sizes, when actually drilling a clearance & pilot hole follow these general tips;
- Set the drill to a slow speed initially
- If your countersink bit is one that only does that, drill the countersink first, Then drill the clearance hole afterwards. If you have two in one, the clearance bit helps keep the countersink bit steady as you drill that (otherwise it will try and wander)
- As you drill the hole, move the drill back and forth to help clear out any waste and avoid clogging the flutes of the drill bit
- When moving back and forth, make sure you keep the drill perfectly vertical/horizontal. If you move the bit from left to right you could snap the drill bit leaving it inside the timber where you want to put a screw
- If the speed is easy to control but taking too long to drill, increase the speed as needed
- Drill the pilot hole slightly deeper than the length of screw you need so there is room at the end of the hole for any excess material to be forced into when winding the screw in
Is there a quicker way than drilling three holes every time I want to put a screw in!?
If you need to use a different drill bit for each of these three application plus a screwdriver bit for winding the screws themselves in you can see it can start to take a very long time to get these done.
Of course if you can mark a series of holes to drill at the start, you can then go along and drill all the clearance holes, all the countersink holes and then offer the work piece up to mark all the pilot holes through into the substrate to drill as well.
Then it is just a case of drilling those and screwing everything together.
To save time drilling all those holes If you can afford them Dewalt Flip Drivers are great, and will already have the right pilot hole drill bit and countersink in one piece ready to go. All you do is drill the pilot hole/countersink, flip the quick release chuck and flip the bit round where it has a screwdriver bit on the other end.
The time is saved by not having to undo the drill chuck and fish around for another bit to insert in there before tightening and carrying on.
Whats next?
To hide large screw holes in finished work-pieces (like staircases or other joinery) I drill larger holes and then fill them with matching wooden pellets inserted the same direction as the grain and cut out of off-cuts of the timber I'm filling.
Click here to see a list of the screws, nails and other fixings I use for 2nd fix finish carpentry.
Or click here for more information about how to drill wood
